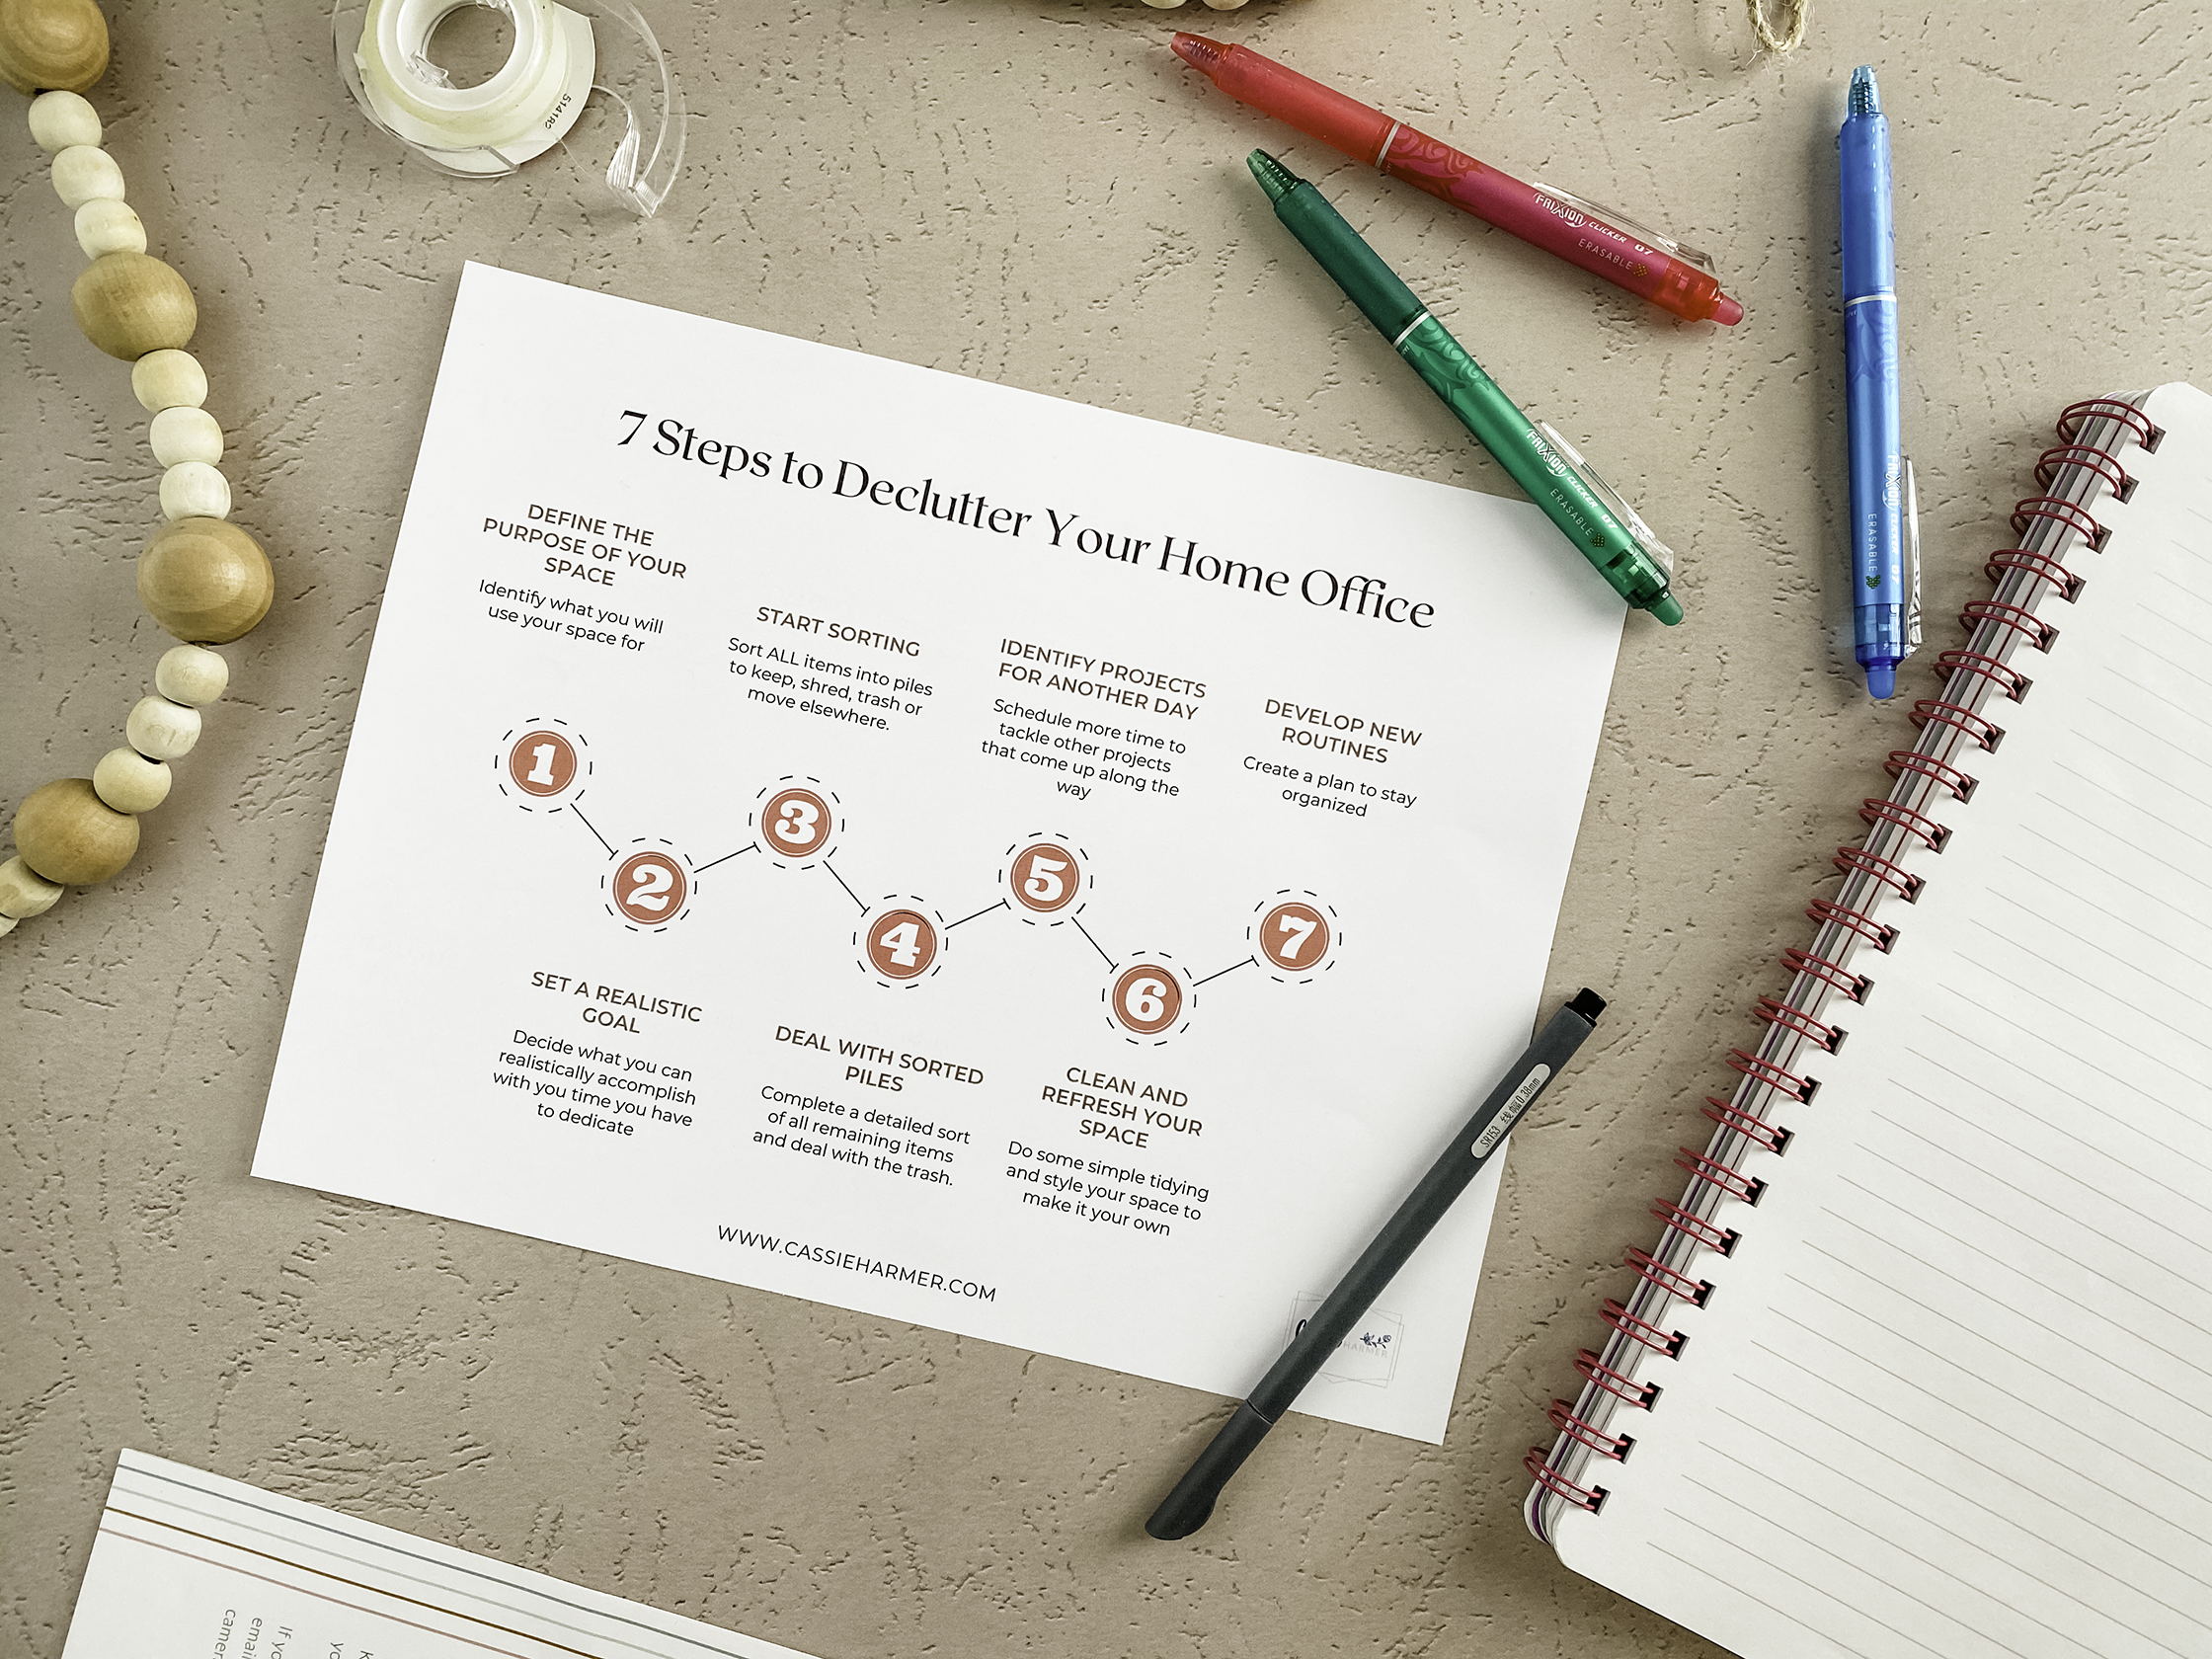
Clutter. A crowded collection of stuff that creates a mess. We all have it. On our kitchen tables. In the entryway. And for some of us, after almost one full year of working from home, we have clutter in our (sometimes make-shift) home offices. Today, I want to share with you seven steps to declutter your home office.
In your home office, aim for as many completely empty surfaces as possible. Free space will actually allow you to be more creative, productive and less stressed.
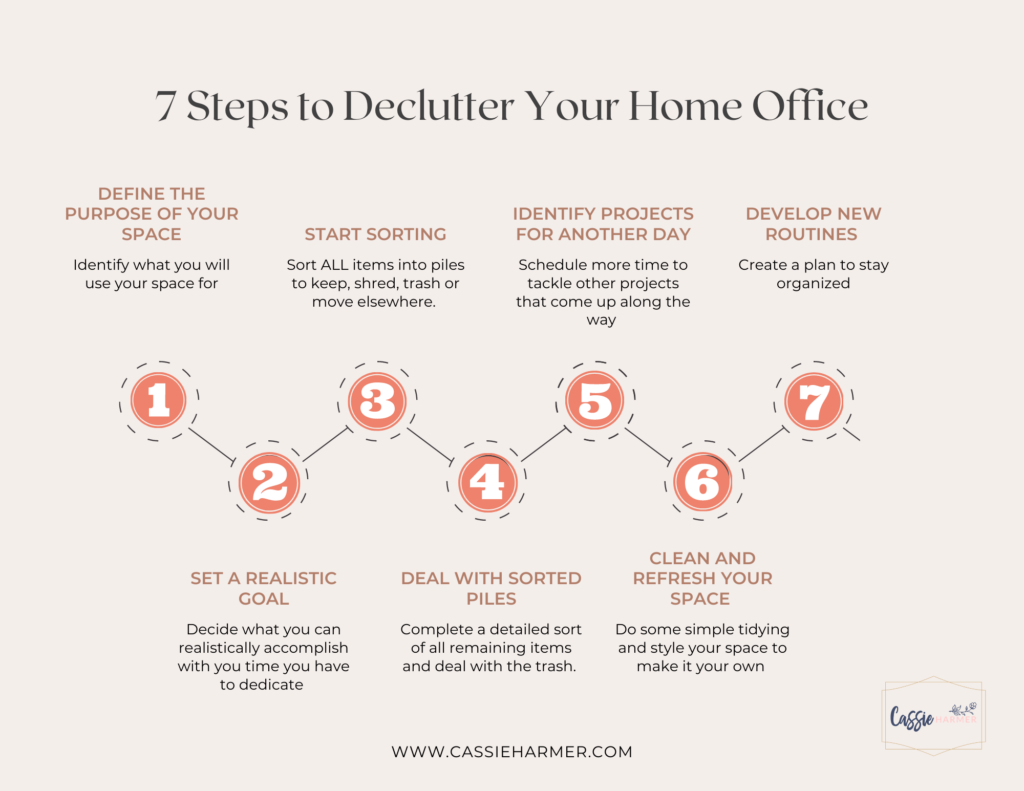
step 1: define the purpose of your space
First things first. You need to start by defining the purpose of your office space. What do you want to get out the space? Are you using the space exclusively for working remotely? Does your space need to double as something else? A craft room, your home’s command center, your dining room?
Identifying the overall purpose of your space will help with all of the steps that come after. So grab a sticky note, a napkin, anything and quickly jot down the purpose of your space. Then place it somewhere you can see it and be reminded through the process.
step 2: set a realistic goal
Start by recognizing that you may not be able to accomplish EVERYTHING in one timeframe. Begin with being realistic about how much time you have to dedicate right away. Do you have a whole day? Or maybe 90 minutes while your child is napping (if you’re lucky)? That’s ok! Use the time you have to be as productive as possible. Tackle the thing that’s driving you the most crazy like the pile of mail that’s been stacking up for months. Or tackle the thing that’s most hazardous like the dangerously precarious over-stuffed bookshelf that could topple at any moment.
As you work through these steps, you are bound to find several additional “mini projects”. (And we’ll chat about some of them later). It’s ok to recognize that you’ll need to carve out extra time to accomplish those.
step 3: start sorting
Once you have a purpose for the space and a realistic goal, it’s time to start SORTING! This is the point where I tell you a tough truth. It’s going to get worse before it gets better. #TRUTHBOMB But it HAS to get worse to get BETTER. Start area by area, desk drawer by desk drawer, shelf by shelf and literally tear it apart. Tear it apart and SORT into the following categories:
- KEEP: DECIDE WHAT WILL STAY IN YOUR HOME OFFICE SPACE. YOU DON’T NEED TO HAVE A FOREVER HOME FOR THESE ITEMS JUST YET, THAT WILL COME LATER.
- SHRED: DECIDE WHAT ITEMS ARE TRASH BUT NEED TO BE REMOVED APPROPRIATELY TO SAFEGUARD YOUR DATA AND OTHER CONFIDENTIAL INFO.
- TRASH: DECIDE WHAT YOU CAN THROW AWAY!
- BELONGS ELSEWHERE: DECIDE WHAT NO LONGER WILL LIVE IN YOUR HOME OFFICE BECAUSE IT DOESN’T FIT IN WITH THE PURPOSE OF YOUR SPACE
I recommend that you complete this initial sorting step as quickly as possible. Finding forever homes for these items will be the next step. Simply focus on what actually does and does not belong in this space. A good rule of thumb is if you haven’t reached for the item in over 6 months, you won’t miss it when it’s gone for good. Don’t be afraid to be ruthless!
But keep in mind, there are some things that you need and should hold onto, like important documents. Here’s some helpful information below.
pause before discarding “important” documents
What are important documents? Important documents are those that cannot be easily replaced and most often, are related to the big milestones in life including getting married, having a baby, buying a house or car. And then there’s the documents that coincide with the only certainties in life: death and taxes. For more information on what important documents you need to keep and for how long, sign up here to download a Quick Reference Guide for Important Documents.
step 4: deal with your sorted piles
items you’ve decided to keep
For items you’ve decided to keep, complete a detailed sort by simply putting “like with like”. Important documents all together. Office supplies (pens and paperclips) all together. Books all together. You get the idea. Then, it’s time to find a place for ALL of those items that can fit in one place. If all of your office supplies or books don’t fit in one place – – it’s a good indication that you still have more work to do in sorting out what you really need to keep. (In other words, go back to Step 3!)
An example of this is my very simplistic “bookshelf rule”. If I ever obtain more books than fit on the bookshelf in my office, it’s time to pair down my book collection. Now, I know that some of you just heard a battle cry and that’s ok. For you, your home office purpose may be to be a library. For me, that’s not the case. This is where having a dedicated purpose for your space can really help define how much you really need to keep.
Here are some other helpful examples of how to organize the items you’ve decided to keep:
- Bookshelf that contains mostly books but also a few organizational bins or baskets. I have had my simple and inexpensive Ikea bookshelf for years and still love it.
- Desk drawers that only hold one category of items (office supplies of the same type, printer paper)
- File drawer for important documents only
- Desk surface with a single cup of writing instruments
Extra Tip: If you’re looking for organizational bins and baskets, be sure to “shop your house” first before grabbing your phone to open your Amazon app!
items you’ve decided to shred / dispose of safely
This task is pretty straight forward, but before tackling your home office declutter project, consider and research the options available to you for shredding documents with confidential or sensitive information. Does your local municipality offer events or mechanisms to shred documents? Do you want to purchase a small personal shredding machine? Once you’ve identified how/when you will shred your documents, designate where you will store items needing to be shredded.
The same goes for disposing of old electronic equipment that may still contain sensitive or confidential information but that you can no longer access. In my latest office declutter (check out the video here), I was shocked at how many electronics we had that we needed to find a safe way to declutter.
items you’ve decided to trash
In my opinion, the most satisfying part of a declutter is lugging the bag of waste to the trash bin. Of course, I recommend that you recycle ♻️ any and all items that you can based on your local waste management guidelines.
items you’ve decided belong elsewhere
I had decided that the purpose of my home office would no longer double as a craft room. It was too overwhelming and there was far too much stuff in one single space. So for me, I had A LOT of art and craft supplies that needed to find another home. I was able to utilize a single shelf in a closet outside of my office to house my art and craft supplies. It was so liberating to have it out of my office and bonus, it now all fit in one single space all on its own.
step 5: identify projects for another day
Connected with step #2 of creating a realistic goal, be sure to identify projects that are meant for another day. Don’t let yourself feel guilty or get distracted by projects that cannot realistically be accomplished in the time you’ve set aside. Take just a few minutes to evaluate these projects and then physically put time on your calendar on another day to tackle them. Great examples of other sub-projects:
- Setting up a filing system for your important documents. Understanding and maintaining your important documents is well…important! So taking the time to set up a better system for them should be an entire project to itself. Be sure to sign up for my Quick Reference Guide for Important Documents to get started.
- Organizing your child’s art and school paperwork. Any parent knows that managing your child’s papers can be a crushing task. With the surge in digital, there is almost no limit to the number of options out there. Stay tuned for a future blog post where I plan to tackle this project!
step 6: clean and refresh the space
Once you’ve identified a home for all of the items that will remain in your new space, take the time to clean and freshen the space FIRST. Dust all the surfaces, clean out and wipe down the inside of any drawers. Once the floor is actually clear, take the opportunity to vacuum or sweep. It’s amazing how good that little bit of tidying feels.
step 7: develop new routines & a plan for staying organized
Unless the idea of completing a giant declutter every few months excites you to no end, I recommend putting some new routines in place to help you keep your space organized.
set aside a few minutes every day tidying your space
- Spend 5 minutes cleaning off your desk surface and returning items that you used to their designated homes
- Spend 10 to 15 minutes handling the incoming paper (keep reading to learn about implementing the 2-touch rule for papers)
implement a “2-touch rule” for all papers
This rule is pretty simple: you aim to touch no single piece of paper (or mail) more than twice when it enters your home. To do this, the first touch is to pick up the paper and examine it and decide what to do with it. The second (and final) touch is the follow through on the decision on what to do with it. In order for it to work, these steps should be done immediately. Choose from the following:
- Sign it and return. A great example is papers that come home from school for your child (permission slips, homework, report cards, etc).
- File / Scan it. Whether it’s an important document or one that is part of a larger project (think your child’s school papers you want to save digitally), file and/or scan the papers immediately.
- Shred it. For papers that contain confidential or sensitive information, complete the step you decided on for shredding your documents.
- Trash it. Let’s face it – – most paper that comes into our house is junk but we often put it off the most! Here’s an easy tip for handling junk mail. As you carry in the mail from the mailbox, literally stop at the closest trash can and toss ALL of the junk mail. That’s it, you’re DONE!
So that’s it! I hope you enjoyed my seven tips for decluttering your home office and found them useful! Are you ready to tackle decluttering your own home office space? Go ahead and schedule whatever time you have to tackle what you can. I’d love to hear about your declutter adventures – – share with me in the comments below!
Also, be sure to check out all of my other lifestyle content and follow me on Instagram, Facebook, YouTube and Pinterest.
XOXO,